Working with APIs in JavaScript Outline: 1. Introduction to APIs: 1.1 Definition of APIs: Explanation of what an API (Application Programming Interface) is. Understanding the role of APIs in web development. Types of APIs: RESTful APIs, SOAP APIs, etc. 1.2 Importance of APIs in Web Development: How APIs facilitate communication between different software systems. Use cases of APIs in modern web development. Examples of popular APIs and their impact. 2. Making API Requests: 2.1 HTTP Methods: Overview of common HTTP methods: GET, POST, PUT, DELETE. Explanation of when to use each HTTP method. 2.2 Fetch API: Introduction to the Fetch API in JavaScript. Making simple GET requests with Fetch. Handling responses from Fetch requests. 2.3 Sending Data in API Requests: Using POST requests to send data to the server. Handling different types of data (JSON, form data) in API requests. 3. Handling API Responses: 3.1 Parsing JSON: Importance of JSON (JavaScript Object Notation) in API r...
Analog Clock in HTML CSS and JavaScript
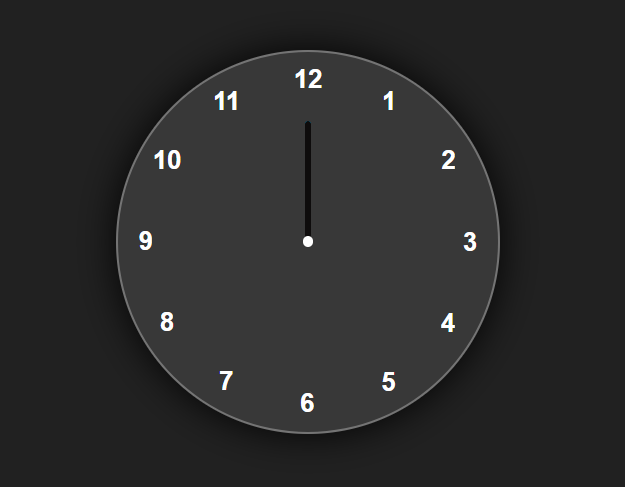
In this blog we will build an analog clock in HTML CSS and JavaScript as shown below:

Open a folder in VS code and create the following three files:
- index.html
- style.css
- script.js
In the index.html file click shift then 1 and then enter on keyboard you will get the following boilerplate code of html:
<!DOCTYPE html>
<html lang="en">
<head>
<meta charset="UTF-8">
<meta name="viewport"
content="width=device-width, initial-scale=1.0">
<title>Document</title>
</head>
<body>
</body>
</html>
and change the title to "Analog Clock":
<!DOCTYPE html>
<html lang="en">
<head>
<meta charset="UTF-8">
<meta name="viewport"
content="width=device-width, initial-scale=1.0">
<title>Analog Clock</title>
</head>
<body>
</body>
</html>
<body>
<div class="container">
<div class="clock"></div>
</div>
</body>
Now in the clock div write a span tag then a bold tag and then 1:
<body>
<div class="container">
<div class="clock">
<span><b>1</b></span>
</div>
</div>
</body>
Now copy the whole span and make 12 spans by using Alt shift and down arrow keys shortcut on keyboard:
<body>
<div class="container">
<div class="clock">
<span><b>1</b></span>
<span><b>1</b></span>
<span><b>1</b></span>
<span><b>1</b></span>
<span><b>1</b></span>
<span><b>1</b></span>
<span><b>1</b></span>
<span><b>1</b></span>
<span><b>1</b></span>
<span><b>1</b></span>
<span><b>1</b></span>
<span><b>1</b></span>
</div>
</div>
</body>
change the 1's and make it from 1 to 12 as shown belew:
<body>
<div class="container">
<div class="clock">
<span><b>1</b></span>
<span><b>2</b></span>
<span><b>3</b></span>
<span><b>4</b></span>
<span><b>5</b></span>
<span><b>6</b></span>
<span><b>7</b></span>
<span><b>8</b></span>
<span><b>9</b></span>
<span><b>10</b></span>
<span><b>11</b></span>
<span><b>12</b></span>
</div>
</div>
</body>
You will get the following output by running live server on VS code:

To attach our style.css file to html file we will use the following link tag in the head tag section:
<link rel="stylesheet" href="style.css">
as shown below:
<head>
<meta charset="UTF-8">
<meta name="viewport"
content="width=device-width, initial-scale=1.0">
<title>Analog Clock</title>
<link rel="stylesheet" href="style.css">
</head>
Now we will do some styling in style.css file. First of all we will do some default style. Every element in html has some default styling. To remove those default styling we will do these styling in css file:
*{
margin: 0;
padding: 0;
box-sizing: border-box;
font-family: sans-serif;
}
To apply styling to all elements of html we use *{}.
Now we will style our body section:
body {
display: flex;
justify-content: center;
align-items: center;
min-height: 100vh;
}
we will use display flex to make things easy for us. Justify-content to center will make the content horizentally center and align-items to center will make items vertically center. we will make min-height as 100vh. If you don't set min-height your items will not be centered in vertical direction. Here is the output after doing these settings in css file:

Change the background color to black and change color of all elments to white so that your fonts will be visible on the black background:
* {
margin: 0;
padding: 0;
box-sizing: border-box;
font-family: sans-serif;
color: #ffffff;
}
body {
display: flex;
justify-content: center;
align-items: center;
min-height: 100vh;
background-color: #212121;
}
Now your output will look like this:

.container{
position: relative;
}
Now we will style our class clock.
.clock {
width: 300px;
height: 300px;
background-color: rgba(255, 255, 255, 0.1);
border-radius: 50%;
}
By setting border radius to 50% will make it round and by setting background color different than the background color of our page you will be able to see it, as shown below:

Now set the border as shown below:
.clock {
width: 300px;
height: 300px;
background-color: rgba(255, 255, 255, 0.1);
border-radius: 50%;
border: 2px solid rgba(255, 255, 255, 0.3);
}
Your new output with the border arround round background is as shown below:

Now set a box-shadow like this:
.clock {
width: 300px;
height: 300px;
background-color: rgba(255, 255, 255, 0.1);
border-radius: 50%;
border: 2px solid rgba(255, 255, 255, 0.3);
box-shadow: 0px 0px 30px rgba(0, 0, 0, 0.9);
}
<div class="container">
<div class="clock">
<span style="--i:1"><b>1</b></span>
<span style="--i:2"><b>2</b></span>
<span style="--i:3"><b>3</b></span>
<span style="--i:4"><b>4</b></span>
<span style="--i:5"><b>5</b></span>
<span style="--i:6"><b>6</b></span>
<span style="--i:7"><b>7</b></span>
<span style="--i:8"><b>8</b></span>
<span style="--i:9"><b>9</b></span>
<span style="--i:10"><b>10</b></span>
<span style="--i:11"><b>11</b></span>
<span style="--i:12"><b>12</b></span>
</div>
</div>
The style for span in clock class is as shown below:
.clock span {
position: absolute;
transform: rotate(calc(30deg * var(--i)));
inset: 12px;
text-align: center;
}
Now you will get this output:

You see the numbers are not in good direction yet. Only 12 looks good. We will style b in clock class in span as shown below:
.clock span b{
transform: rotate(calc(-30deg * var(--i)));
display: inline-block;
font-size: 20px;
}
We rotated the numbers by -30 dgree angle to make them look straight. The ouput is now like this:

Now we will design our small round circle dot point in the center of clock. We will write a Pseudo before clock. we will use content as empty, set position as absolute width and height to 8px, border-radius as 50% to make it round and background-color to white so that it can be seen on the black background.
.clock::before {
content: '';
position: absolute;
width: 8px;
height: 8px;
border-radius: 50%;
background-color: #ffffff;
z-index: 1;
}
You see the dot circle is not in the center yet.

we will make it in center by setting display to flex in the clock class, then justify-content to center will make it horizontally center and then align-items to center will make it vertically center as shown below:
.clock {
width: 300px;
height: 300px;
background-color: rgba(255, 255, 255, 0.1);
border-radius: 50%;
border: 2px solid rgba(255, 255, 255, 0.3);
box-shadow: 0px 0px 30px rgba(0, 0, 0, 0.9);
display: flex;
justify-content: center;
align-items: center;
}
The output will look now like this:

<div class="hand"><i></i></div>
<div class="hand"><i></i></div>
<div class="hand"><i></i></div>
.hand i {
position: absolute;
background-color: #fff;
width: 4px;
height: 94px;
border-radius: 8px;
}
You will get the following output:

All three hands are of white color, same length and are on top of each other that is why you will see the only one hand. These hands are showing in bottom side but we want them to start from top at 12. Now we will use a "--clr" variable in hand tag dives of index.html file as shown below:
<div style="--clr:#2a7e53;" class="hand"><i></i></div>
<div style="--clr:#00a6ff;" class="hand"><i></i></div>
<div style="--clr:#0e0c0c;" class="hand"><i></i></div>
Now put that variable in the background-color of hand class of i tag like this:
.hand i {
position: absolute;
background-color: var(--clr);
width: 4px;
height: 94px;
border-radius: 8px;
}

.hand {
position: absolute;
display: flex;
justify-content: center;
align-items: flex-end;
}
Your ouput now will look like this. Everything is centered correctly:
Now we will attach the script.js file to our html file by writing the script tag at the end of body tag as shown below:
<div style="--clr:#2a7e53;" class="hand"><i></i></div>
<div style="--clr:#00a6ff;" class="hand"><i></i></div>
<div style="--clr:#0e0c0c;" class="hand"><i></i></div>
</div>
</div>
<script src="script.js"></script>
</body>
Now we will set ids and --h variables for three different hand colors in the hand class div tags for hour, minute and second like this:
<div style="--clr:#2a7e53; --h:94px" id="hour"
class="hand"><i></i></div>
<div style="--clr:#00a6ff; --h:104px" id="min"
class="hand"><i></i></div>
<div style="--clr:#0e0c0c; --h:114px" id="sec"
class="hand"><i></i></div>
Also set the variable for height of i tag in hand class in style.css file like this:
.hand i {
position: absolute;
background-color: var(--clr);
width: 4px;
height: var(--h);
border-radius: 8px;
}
which will show three different hand colors in the clock.
Now will write analogTime function in the script.js file as shown below:
First we will set hour, min and sec variables like this:
let hour = document.getElementById('hour');
let min = document.getElementById('min');
let sec = document.getElementById('sec');
Now we will write the function like this:
function analogTime() {
let date = new Date();
//getting hour, min, secs from date
let hh = date.getHours();
let mm = date.getMinutes();
let ss = date.getSeconds();
let hRotation = 30 * hh + mm / 2;
let mRotation = 6 * mm;
let sRotation = 6 * ss;
hour.style.transform = `rotate(${hRotation}deg)`;
min.style.transform = `rotate(${mRotation}deg)`;
sec.style.transform = `rotate(${sRotation}deg)`;
}
setInterval(displayTime, 1000);
we created a new date object. Then we created three variables hh, mm, ss for hours, minutes and seconds. we got the value of those variables by using getHours, getMinutes and getSeconds methods.
In the above function we used three formulas for the rotation of clock hands. The explaination of those formulas are as follows:
Hours:
Hour hand completes one rotation in 360 degrees. so it means 12 hours will take 360 degrees. Then one hour will take 360/12 degrees which is equal to 30 degrees. So h hours will take 30h degrees. Due to rotation of min hand there will be a little rotation in hour hand too. There are 60min in a hour. So 60min equal to 30deg and 1 min equal to 30/60 equals to 1/2 deg. So m mins equal to m/2 deg. So we will add m/2 in the h hours. Here is the complete formula for hours hand:
12 hours = 360 deg
1 hour = 360/12 = 30 deg
h hours = 30h + m/2 deg
Minutes:
Minutes hand also takes 360 degrees for one rotation. There are 60 minutes in a hour. So 60min equal to 360deg. one min equal to 360/60 is equal to 6 degrees and m min will equal to 6m like this:
60 min = 360 deg
1 min = 360/60 = 6 deg
m min = 6m deg
Seconds:
There are 60 seconds in a minute. so 60sec is equal to 360deg and 1 sec is equal to 360/60 deg which is equal to 6 degree and s secs will equal to 6s degree, like this:
60 secs = 360 deg
1 sec = 360/60 = 6 deg
s secs = 6s deg
we used the transform of css through JavaScript to rotate the hands. We used the back tick in that codes, the key which is located on the left side of 1 key on keyboard.
The ouput of our completed clock is now as shown below:

Comments
Post a Comment